Dental Shade Matching: Why Lab Communication Matters
B1 or 2M1?
Your patient wants a restoration that looks natural. You’ve checked the shade guide, taken the photos, and narrowed down your options. But there’s still a detail worth discussing with your lab.
For anterior crowns and veneers, dental shade matching is more than choosing the closest shade tab. The final appearance can depend on the restorative material, thickness, underlying tooth color, and how the case is communicated to the technician.
That’s why the conversation between dentist and dental lab matters just as much as the initial shade selection.
Why Dental Shade Matching Goes Beyond a Shade Code
A shade code gives your dental technician a reference. But it doesn’t necessarily tell the whole story.
Consider an anterior crown next to natural teeth. Even when the selected shade looks close, differences in translucency, brightness, or surface characteristics may make the restoration stand out.
The same applies to veneers, especially when patients want a subtle change rather than a completely new shade.
Several factors can affect the final appearance:
- Restorative material: Different ceramics have different optical properties.
- Restoration thickness: The thickness of porcelain or ceramic can affect how light passes through the restoration.
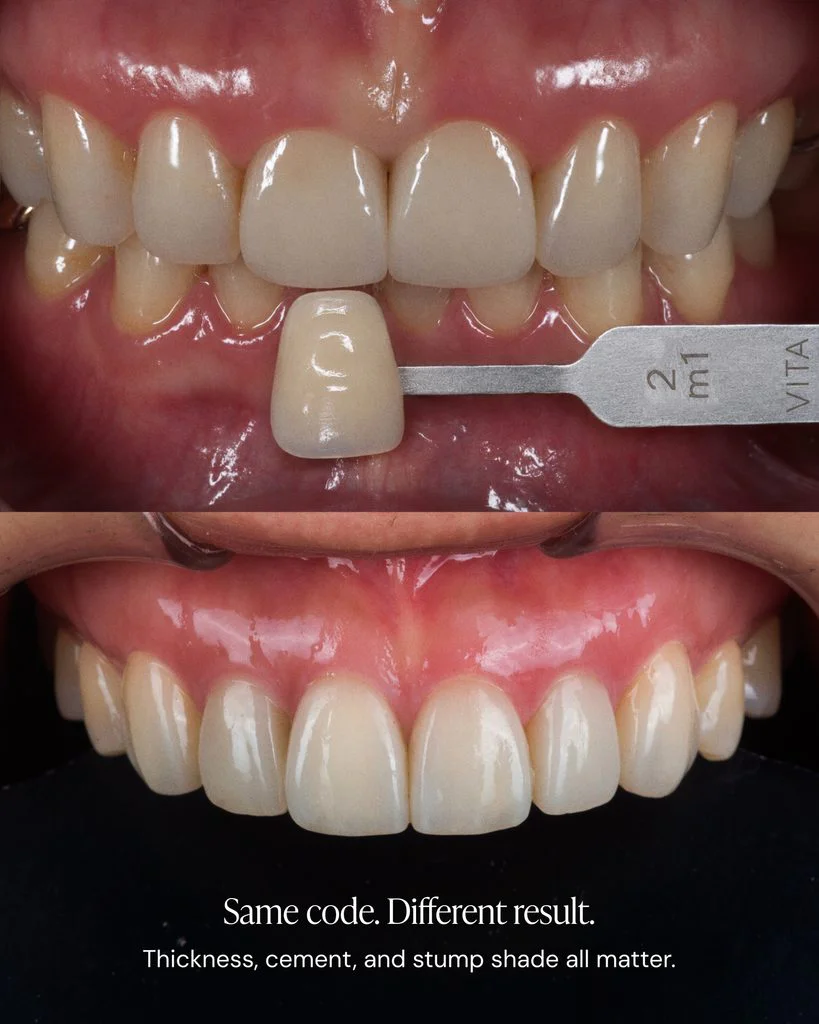
- Stump shade: The underlying tooth color may influence the appearance of translucent restorations.
- Cement shade: Particularly with thin veneers, the selected luting cement can contribute to the final color.
- Translucency and characterization: Incisal effects, surface texture, and internal color variations help create a natural appearance.
A study on ceramic restorations found that ceramic thickness and cement shade can influence the final color after bonding.
The takeaway? A shade number is a starting point. The details behind it matter, too.
A Real Veneer Case: B1 or 2M1?
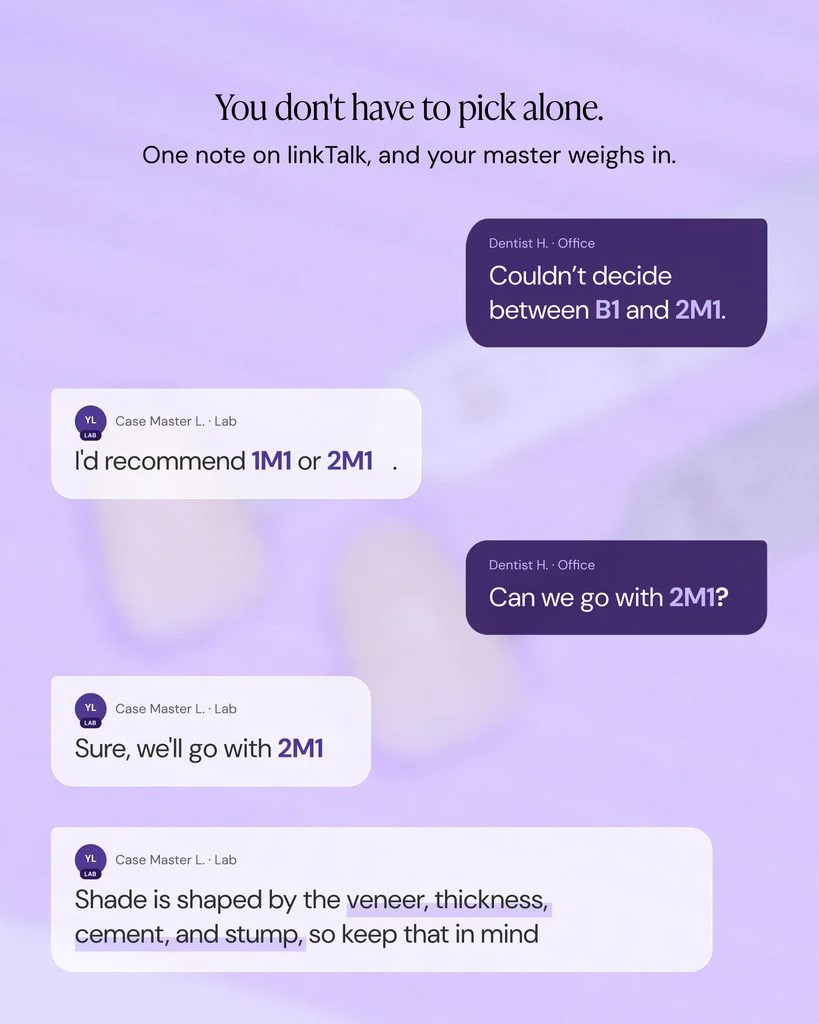
Here’s how that conversation played out in a real case at Dentlink.
A patient wanted her replacement veneers to look slightly lighter than her existing restorations.
The dentist had narrowed the shade options to B1 and 2M1 but wanted the lab’s input.
The case note read:
“She wants slightly lighter than her existing veneers. Couldn’t decide between B1 and 2M1. Please advise.”
Rather than leaving the decision at the initial prescription, the dentist and the designated Dentlink Case Master discussed the options.
From Dental Shade Matching Question to a Clearer Decision
The Case Master recommended considering 1M1 or 2M1.
The dentist then asked whether they could proceed with 2M1, and the technician confirmed.
But the conversation didn’t end there.
The Case Master also explained that the veneer’s final appearance depends on its shade, thickness, cement, and stump shade.
The dentist acknowledged the advice and planned to consider a different cement shade.
This is what effective dental lab communication can look like: the dentist shares the clinical goal, the technician contributes fabrication expertise, and the dentist makes the clinical decision with more information.
It wasn’t just about choosing between two shade codes. It was about considering what could affect the restoration once seated.
Why Lab Communication Matters for Anterior Crown Shade Matching
Although the example above involves replacement veneers, the same communication principles matter when planning anterior crowns.
For a single anterior crown, the restoration must work alongside the surrounding natural teeth. A shade guide provides an initial reference, but other characteristics may require clarification.
For example, a dentist might need to communicate:
- Whether the restoration should match adjacent natural teeth or existing restorations
- Differences in cervical, middle, and incisal coloration
- The underlying preparation shade, particularly with discolored teeth
- The desired translucency or surface characterization
- Any patient-specific esthetic preferences
These are details a technician may need to interpret during material selection and fabrication.
And when something is unclear, having a direct conversation can help the dentist and technician align on the intended result before the case proceeds.
For esthetically demanding anterior cases, that communication is part of the workflow—not an extra step reserved for problems.
Learn more about Dentlink’s Premium Crown services for anterior restorations.
What Should You Send Your Dental Lab for Better Dental Shade Matching?
Clear dental shade communication starts with useful clinical information.
You don’t need a lengthy explanation for every case. But a few details can help your technician better understand what you’re trying to achieve.
1. Shade Photos With a Visible Reference
Include photos showing the target tooth alongside clearly identifiable shade tabs.
Whenever possible, maintain consistent lighting and avoid photographing teeth after prolonged dehydration.
A photo with the shade tab number visible gives your technician a more useful reference than an isolated tooth image.
2. Stump Shade When Relevant
For restorations where the underlying tooth color may affect the result, include the preparation shade.
This can be particularly useful when working with translucent ceramics or discolored anterior teeth.
3. The Patient’s Actual Esthetic Goal
A request such as “slightly lighter than the existing veneers” communicates something a shade code alone cannot.
Is the patient looking for a subtle improvement? A brighter smile? A close match to adjacent teeth?
Tell your lab what the patient expects to see.
4. Details Worth Discussing Before Fabrication
If you’re deciding between shades, considering cement options, or dealing with an unusual underlying tooth color, bring those questions to your technician.
The goal isn’t to send a perfect prescription with every possible answer.
It’s to give your technician enough context to ask the right questions and discuss the options with you.
How Dentlink Makes Shade Communication More Direct
At Dentlink, each case is assigned a designated Case Master—the technician responsible for that restoration.
Through linkTalk, dentists can communicate directly with their Case Master about shade preferences, clinical photos, and fabrication details.
That means you can:
- Share clinical photos and shade notes with the technician handling your case.
- Ask for feedback when choosing between shade options.
- Discuss restoration details that may influence the final appearance.
- Review the technician’s suggestions and confirm the direction for your case.
The real veneer case above shows this workflow in action.
The dentist didn’t have to make the decision without input. The Case Master offered options, explained relevant fabrication considerations, and responded to the dentist’s final choice.
For more about this approach, read Why a 1:1 Dental Technician Changes the Way You Work With a Dental Lab.
Better Shade Decisions Start With Better Conversations
Whether you’re replacing veneers or restoring a single anterior crown, dental shade matching isn’t always a straightforward choice between two tabs.
Sometimes, it’s the conversation after the shade note that makes the difference.
At Dentlink, your Case Master is part of that conversation—helping you review the details, consider the options, and move forward with a clearer plan.
Have an anterior crown or veneer case to discuss?
Explore our Premium Veneer services or Premium Crown services, and talk directly with the Case Master handling your restoration.
Send Your Next Case to Dentlink
Made by Masters.
Frequently asked questions
Can a shade guide alone ensure an accurate match?
Why is stump shade important for veneers and anterior crowns?
What should I do if I'm deciding between two shades?
Does dental lab communication replace a physical shade appointment?
Your first crown is on us.
Free implant crown, free scanbody kit, and $200 off your next case. Just send your first scan.
Create your Dentlink account, register your clinic, add Dentlink as your lab in your scanner software, then send your case.